What’s Inside
- Embrace Warm, Earthy Tones for a 2026 Refresh
- Use Peel-and-Stick Wallpaper for High-Impact Home Decor DIY Ideas
- Build Custom Floating Shelves on a Budget
- Create a Fluted Wall Panel Accent
- Upcycle Furniture with Eco-Friendly Paints
- Master the Art of Hanging Artwork at the Right Height
- Don’t Underestimate the Power of Mood Boards
- DIY Concrete Countertops for a Modern Edge
- Layer Lighting for Ambiance, Ditching Harsh Whites
- Incorporate Vintage Finds for Personalized Spaces
- Avoid Overly Matchy Furniture Sets
- Use Architectural Salvage for Unexpected Charm
- Test Paint Colors with Foam Core Boards
- Prioritize Quality Tools and Materials
- Don’t Forget the “Fifth Wall” – Your Ceiling
- Upgrade Builder-Grade Mirrors with Custom Frames
- Swap Out Cabinet Hardware for an Instant Fix
- Install a Faux Brick Accent Wall for Basement Home Decor DIY Ideas
- Create Custom Textured Canvas Art
- Build a DIY Window Seat with Hidden Storage
I sat on my living room floor last October, staring at a massive patch of peeled drywall where a command hook had ripped away my mirror. The powdery white plaster dust coated my hands, smelling faintly of old chalk. That exact frustration forced me to rethink my space. When you’re searching for home decor DIY ideas, the internet feeds you generic fluff that doesn’t work in a real house. I’m not interested in wasting time on flimsy crafts. Over the last four years, I’ve tested hundreds of projects in my 1980s ranch house, making expensive mistakes so you don’t have to. Let’s talk about what actually holds up to daily life, muddy dog paws, and tight budgets. Trust me on this.
1. Embrace Warm, Earthy Tones for a 2026 Refresh

I’m officially done with clinical, cool grays. They make rooms feel like a dentist’s waiting area. The shift toward grounding, nature-inspired colors is exactly what my tired walls needed. I tested Sherwin Williams’ 2026 Color of the Year, “Universal Khaki,” in my guest bedroom. It’s a grounded neutral costing about $45 a gallon, instantly warming up the space. If you want something richer, Valspar’s “Warm Eucalyptus” is an earthy green that hides scuff marks beautifully. For a bolder look, I’ve seen deep Oxblood trending hard for cabinetry. I painted my bathroom vanity a glossy oxblood last month. The finish is stunning, but dark glossy paint shows every speck of dust. You’re going to wipe it down constantly. Still, the rich depth beats plain white builder-grade cabinets any day.
2. Use Peel-and-Stick Wallpaper for High-Impact Home Decor DIY Ideas

I tried applying cheap peel-and-stick wallpaper from Amazon three years ago. It ended up looking like a wrinkled mess that peeled off in humidity. Learned that the hard way. Skip the bargain bins. For renter-friendly home decor DIY ideas, you need high-quality vinyl. Brands like Love vs. Design offer over 200 customizable colors with a 3-business-day turnaround on custom orders. I used their smooth vinyl option ($45 per roll) in my hallway. Chasing Paper is another solid choice, using high-quality poly-woven fabric and GREENGUARD Gold Certified ink. Fancy Walls also offers over 3,300 PVC-free options. The biggest mistake you can make is rushing the application. I ruined a $60 panel by pulling the backing off all at once. Apply it slowly, smoothing from the center outward with a plastic squeegee to prevent bubbles.
3. Build Custom Floating Shelves on a Budget

Store-bought floating shelves are notoriously flimsy, sloping forward the second you place a heavy bowl on them. You can build incredibly sturdy custom shelves for a fraction of the cost. I built simple rustic shelves for my laundry room using basic 2x10s from Home Depot, 4-inch screws, and a $9 can of Minwax stain. They cost me about $5 each. For a heavier duty kitchen project, I used a DIY setup with 2×2 lumber for the internal bracket, covered by 1/4-inch maple plywood. With lag bolts and wood glue, the whole system cost around $91 and holds heavy ceramic plates without bowing. Keep shelf lengths under 48 inches for optimal stability. Choose a depth of 6 to 8 inches for bathrooms, and 10 to 12 inches for kitchens.

Vintage Vase Set of 3, Ceramic Vintage Flower Vases
A dependable everyday pick — Vintage Vase Set of 3 pulls in 306 ratings at 4.5 stars. Not flashy, just solid.
4. Create a Fluted Wall Panel Accent

Contractors will charge you anywhere from $1,000 to $2,000 for a custom fluted wood accent wall. I’m not paying that. You can achieve this textured, high-end look yourself. I found stick-on fluted panels online for $27 per 14.7cm wide panel. They have a warm, earthy wood finish that smells faintly of fresh pine. To install them, I used a heavy-duty adhesive called Max Bond. Don’t rely solely on the factory sticky back. It won’t hold up in a humid room. I applied a zig-zag of Max Bond down the back of each panel and pressed it firmly into the drywall. You just need a sharp utility knife to trim the edges around outlets. The vertical lines draw the eye up, making standard 8-foot ceilings feel significantly taller.
5. Upcycle Furniture with Eco-Friendly Paints

I used to hate painting old furniture because the chemical smell gave me a migraine for days. Now, I strictly use eco-friendly, low-VOC paints. Dixie Belle Paints ($24 for an 8 oz jar) is my current go-to for thrift store flips. The chalky mineral formula grips onto old varnishes without requiring heavy sanding. I picked up a battered oak dresser from a local thrift shop last Tuesday. It smelled like mothballs and had water rings all over the top. I painted the exterior a soft, matte charcoal. Here is a brilliant trick I learned from furniture artist Annie Sloan. Paint the outside a neutral color, but add a flash of vibrant color inside the drawers. I used bright mustard yellow. Every time I open it, that pop of yellow is a joyful surprise.
6. Master the Art of Hanging Artwork at the Right Height

Most people hang their art entirely too high. I did this for years, leaving my living room looking like an art gallery for giants. The old “hang it at eye level” rule is misleading because everyone’s eye level is different. Instead, use hard math. The center of your artwork should sit exactly 57 to 60 inches from the ground. I keep a tape measure in my junk drawer specifically for this. When hanging a piece above a sofa or console table, position the bottom edge of the frame just 4 to 8 inches above the furniture. This creates a cohesive visual unit rather than letting the art float awkwardly near the ceiling. I recently re-hung a heavy canvas over my Target entryway table using this exact formula, and it finally looked balanced. You might also like: 17 Cozy Living Room Inspiration Worth Trying

Ceramic Vase for Flowers
Ceramic Vase for Flowers – Modern Small Ribbed Textured Flower Vase fo has been one of the most consistently praised picks in this category. 646 reviewers averaged 4.5/5.
7. Don’t Underestimate the Power of Mood Boards

Skipping the planning phase is how you end up with a room that feels like a chaotic theme park. I once painted a bedroom teal, bought a red rug, and tried to mix in rustic wood furniture. It was a disaster. Before buying a single can of paint, you need a mood board. Pinterest is the easiest tool for gathering inspiration, but you have to look for recurring patterns. Notice if you keep pinning velvet textures, brass hardware, or specific wood tones. A mood board defines your design concept and keeps you focused. When redesigning my home office, I printed out photos of my rug, my desk, and three potential paint swatches. Seeing them side-by-side on white poster board showed me instantly that the gray paint clashed horribly with my warm oak desk. You might also like: 18 Easter Home Decor Ideas Worth Trying
8. DIY Concrete Countertops for a Modern Edge

Pouring concrete countertops sounds intimidating, but it gives you an incredible industrial-chic look for very little money. I didn’t want to rip out my old laminate laundry room counters, so I used a Z Counter-Pack conversion kit. This kit converts a standard $6 60-lb bag of concrete mix into a high-performance countertop material. A set of six kits costs $84.99 and covers about 22.5 square feet at 1-5/8 inches thick. The process is messy. Your garage will smell like wet dust and minerals for a week. You mix the concrete, pour it into the specialized edge forms, and smooth it out. If you have a larger kitchen, you can buy overlay kits ranging from $380 for 32 square feet up to $845.91 for 120 square feet. Just make sure you seal it properly with a food-safe wax. You might also like: 16 Living Room Decor Fireplace Worth Trying
9. Layer Lighting for Ambiance, Ditching Harsh Whites

Overhead flush-mount lights are the enemy of a cozy room. They cast harsh, flat shadows that make everything look cheap. The 2026 trend is all about warmer, layered lighting. I swapped out every cool-toned LED bulb in my house last month. I bought a pack of app-controlled smart bulbs for $35 that let me adjust the color temperature from crisp daylight to a warm, amber glow. I also installed $15 warm LED light strips under my kitchen cabinets and behind my bed’s headboard. The soft, indirect glow completely shifts the mood of the space. I even put small, battery-operated puck lights inside my glass-front cabinets. Just avoid the cheap, bright blue-white LEDs. They make your living room feel like the fluorescent aisle at Walmart. Stick to temperatures around 2700K for a welcoming feel.
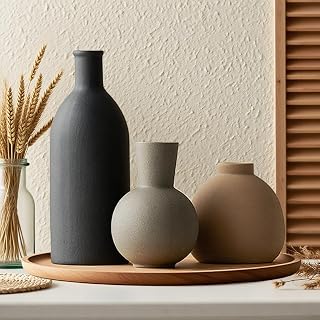
Ceramic Vase Set of 3, Vases Home Decor
Honestly, Ceramic Vase Set of 3 surprised me — sturdier than it looks in the photos, and over 30 buyers gave it 4.5 stars.
10. Incorporate Vintage Finds for Personalized Spaces

Big-box store decor can make your house look like a catalog. To get that layered, collected feel, you need vintage pieces with actual history. I spend my Saturday mornings digging through antique malls looking for items with a natural patina. Sterling silver serveware, heavily oxidized copper bowls, and carved wood pedestals add instant character. Last month, I found a heavy, tarnished copper pot for $12. I didn’t polish it. I left the green oxidation exactly as it was and used it as a planter for a fern. Display columns and pedestals are also making a major comeback for 2026. Layering these small, textured accessories on coffee tables or styling them deep inside bookcases adds a level of depth you simply can’t buy brand new off a shelf.
11. Avoid Overly Matchy Furniture Sets

Walking into a furniture showroom and buying the matching sofa, loveseat, and coffee table set is the fastest way to make your home look dated. I made this mistake in my first apartment. Everything was matching dark espresso wood, and the room felt entirely flat and lifeless. Curating pieces over time is much better. Mix complementary styles, finishes, and materials. I paired a modern, cream upholstered sofa with a heavily distressed, vintage oak coffee table I found on Facebook Marketplace for $40. Then, I added a sleek black metal side table. Mixing metal and wood tones within the same room adds visual friction, which is what makes a space interesting. If your current room feels boring, try breaking up your matching sets and bringing in a contrasting texture like leather or woven rattan.
12. Use Architectural Salvage for Unexpected Charm

Architectural salvage yards are goldmines for unique decor. Incorporating pieces of old buildings into a modern home creates a rare element that sparks conversation. I found a massive, chippy solid wood door at a salvage yard in Ohio for $65. Instead of hanging it, I laid it flat, sealed it with four coats of matte polyurethane, and attached heavy iron legs to create a massive dining table. The texture of the peeling paint under the smooth top coat is incredible. You can also use old, paned window frames as rustic wall art, or mount a heavy, carved wooden cornice piece above a doorway as a decorative shelf. Just be prepared to clean these pieces thoroughly. They’re usually caked in decades of grime and smell like old attics, but a scrub with heavy-duty degreaser brings them back to life.

Modern Ceramic Vase Set, Neutral Colors
If you want something that just works, Modern Ceramic Vase Set is a safe bet (259 reviews, 4.5 stars).
13. Test Paint Colors with Foam Core Boards

Never paint a color swatch directly onto your wall. Your current wall color will alter how your eye perceives the new swatch, and the rough edges will show through your final coat. I learned this the hard way when I ended up with a patchy, uneven finish in my dining room. Instead, buy a $3 piece of white foam-core board from a craft store. Cut it into a large square, at least 2×2 feet, and paint your sample color directly onto the board. This allows you to move the color around the room. I prop my painted boards against different walls at different times of day. A beige that looks perfectly creamy in the morning light might pull a sickly green undertone by 4:00 PM. This simple testing method saves you from spending $60 on a gallon of paint you hate.
14. Prioritize Quality Tools and Materials

I tried to hang heavy blackout curtains using cheap plastic drywall anchors that came free in the box. Two days later, the entire rod ripped out of the wall, taking a chunk of drywall with it. The biggest mistake you can make in any DIY project is using weak adhesives or low-quality hardware. When you’re installing anything heavy, like floating shelves or large mirrors, throw away the included hardware. Buy high-quality, 4-inch wood screws and drive them directly into the wall studs. If you can’t hit a stud, use heavy-duty toggle bolts rated for at least 50 pounds. Investing in a good quality stud finder ($25 at Lowe’s) and a reliable cordless drill will save hours of frustration. Your projects will actually stay on the walls, and you won’t have to patch massive holes later.
15. Don’t Forget the “Fifth Wall” – Your Ceiling

Ceilings are almost always ignored. We paint the walls, change the floors, and leave a dull, scuffed ceiling untouched. Painting your ceiling a crisp, flat white instantly makes a room feel more expansive, especially if you have low 8-foot ceilings. I spent a weekend rolling fresh ceiling paint in my primary bedroom, and the light it reflected was shocking. To push this visual trick even further, address your window treatments. Hang your curtain rod higher and wider than the actual window frame. I mount my rods about 3 inches above the window casing, right near the ceiling line. This draws the eye upward, faking the illusion of taller walls and massive windows. It’s a $30 fix that alters the entire proportion of the room.

Vanselia Ceramic Flower Vase Home Decor
Honestly, Vanselia Ceramic Flower Vase Home Decor – Farmhouse Table Vases Rustic surprised me — sturdier than it looks in the photos, and over 786 buyers gave it 4.5 stars.
16. Upgrade Builder-Grade Mirrors with Custom Frames

My bathroom had one of those massive, frameless mirrors glued directly to the drywall with giant plastic clips. It looked incredibly cheap. Instead of ripping it off and risking shattered glass everywhere, I framed it out right on the wall. I bought standard 1×3 pine trim boards from Home Depot for $15 total. I stained them a rich walnut color to match my vanity. Using a tube of heavy-duty Liquid Nails ($4), I glued the wood pieces directly onto the glass, covering the ugly plastic clips entirely. I held the boards in place with painter’s tape for 24 hours while the adhesive cured. It instantly gave the bathroom a custom, finished look. Just make sure you paint the back of the wood trim black before gluing it, otherwise, you’ll see the raw wood reflection in the mirror.
17. Swap Out Cabinet Hardware for an Instant Fix

If you’re renting, or just broke, you can’t always paint cabinets or replace countertops. But you can always change the hardware. My kitchen originally had shiny, cheap plastic knobs that felt greasy no matter how much I scrubbed them. I ordered a 30-pack of matte black, solid metal pulls from Amazon for $35. Swapping them out took me exactly 45 minutes with a manual screwdriver. The heavy metal feels cold and substantial in your hand, making the entire cabinet feel more expensive. I also found beautiful brushed brass pulls at Target for my bathroom vanity. Just make sure you measure the center-to-center hole distance on your existing pulls before ordering. I once ordered a beautiful set of handles only to realize they were half an inch too short for the pre-drilled holes in my drawers.
18. Install a Faux Brick Accent Wall for Basement Home Decor DIY Ideas

Real exposed brick is gorgeous, but installing brick veneer is incredibly messy and expensive. I wanted the texture of brick in my basement without the masonry work. I used 4×8 foot hardboard faux brick panels from Lowe’s, costing about $40 a sheet. Out of the box, they look a bit fake and shiny. The trick to making them look authentic is German Schmear. I bought a bucket of pre-mixed drywall joint compound ($18) and smeared it roughly over the panels with a plastic putty knife, leaving some of the red brick showing through. Once it dried, it felt chalky and rough, exactly like real aged masonry. It completely eliminated the shiny plastic look. It’s one of my favorite projects because it adds massive architectural interest to a boring basement wall for under $150.
19. Create Custom Textured Canvas Art

Large-scale art is ridiculously expensive. A 36×48 inch canvas can easily cost $300 at a standard retail store. I make my own textured art for a fraction of that price. I buy large, cheap canvases from craft stores when they go on sale (usually around $25). Then, I take leftover drywall joint compound and spread it heavily across the canvas using a trowel, an old comb, or even a crumpled plastic bag to create deep, chaotic ridges. Once the compound dries completely hard, I paint over it with leftover wall paint. I mixed a beige and a soft terracotta color for my last piece. The thick texture catches the light beautifully, creating deep shadows that look like an expensive plaster piece you’d find in a high-end boutique. It takes zero artistic skill, just a willingness to get your hands messy.
20. Build a DIY Window Seat with Hidden Storage

I always wanted a cozy reading nook, but custom built-ins cost thousands. I hacked my own window seat using IKEA Nordli drawer units. I bought two of the low, wide units for about $200 each and placed them side-by-side under my living room window. To make it look built-in, I attached a piece of 3/4-inch MDF to the top, painted it to match the drawers, and added basic baseboard trim around the bottom to hide the gap between the furniture and the floor. I bought a 3-inch thick piece of high-density foam from a craft store and wrapped it in heavy canvas fabric to create a custom cushion. Now I have a massive seating area that hides all my ugly winter blankets and board games. It’s solid, functional, and looks entirely custom. Took me years to figure out these space-saving hacks.
I’ve spent years turning boring rooms into spaces I actually want to live in, and it rarely requires a massive budget. It just requires patience, the right materials, and a willingness to make a mess. Don’t be afraid to test a weird paint color or build a shelf yourself. If you found these projects helpful, pin this article to your home design boards so you have the measurements and product names ready for your next weekend project.
Frequently Asked Questions
What are the best budget-friendly home decor diy ideas for renters?
Peel-and-stick wallpaper and changing cabinet hardware are perfect renter-friendly options. Brands like Love vs. Design offer damage-free custom wallpaper, while swapping basic plastic knobs for matte black metal pulls instantly upgrades a kitchen without risking your security deposit.
How much does it cost to build DIY floating shelves?
You can build basic rustic floating shelves for about $5 each using 2×10 lumber and wood stain. For heavier duty kitchen shelves using 2×2 internal brackets and maple plywood, expect to spend around $90 for materials that hold heavy dishes.
What is the correct height to hang artwork on a wall?
The center of your artwork should sit exactly 57 to 60 inches from the floor, rather than guessing at eye level. If you’re hanging a piece above furniture like a sofa, position the bottom edge of the frame 4 to 8 inches above the piece.
How do I test a new paint color before painting the whole room?
Never paint directly on your wall. Instead, paint a 2×2 foot piece of white foam-core board. This allows you to move the sample around the room to see how the color shifts in different lighting conditions throughout the day.
